Это чувство сопричастности
Моей малости безмерной
С безразмерной неподвластностью."


Size M-L
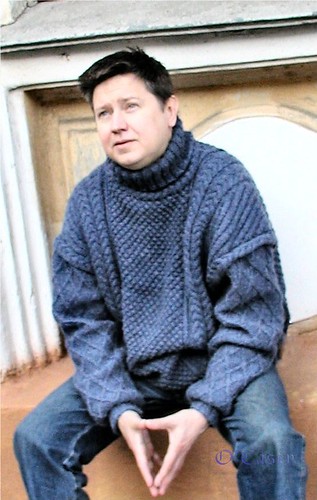
Full length of sweater is approximately 28" (71 cm), width – 25.5'' (65 cm).
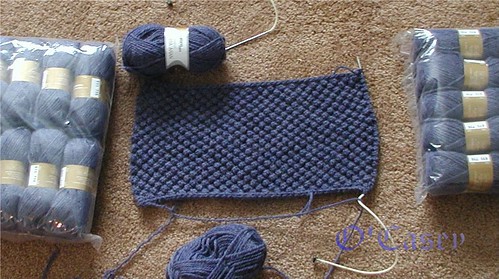
Materials: 23 skeins of elann Peruvian Highland wool: 1.75 oz (50 g)/91 yards (83m)
Needles – US 8 (5mm) or size needed to obtain 18 sts-4" (10 cm) gauge in stockinette stitch.
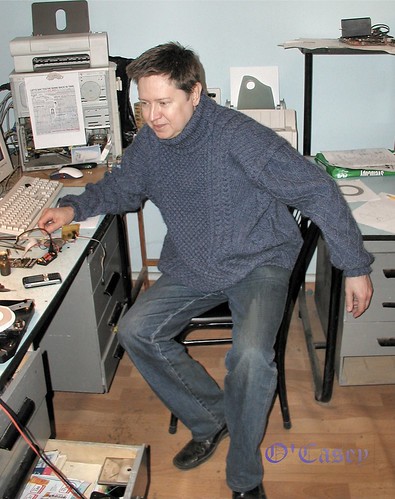
The sweater is not for those knitters who hate sewing. I love sewing and prefer to make all the details separately, even raglans.
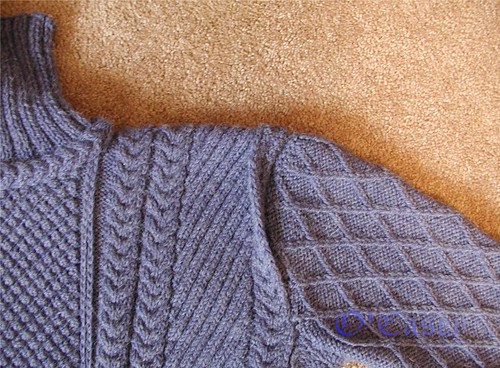
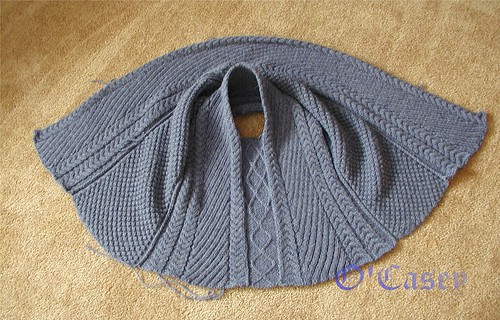
The body of the sweater is made of one front central panel and one back central panel (they differ only by neckline shape), 2 very long symmetrically knitted side panels without shoulder seams, and 2 identical small under-arm panels, knitted in “diamond” pattern. Central panels are made with “trinity” pattern. Side panels are made with symmetrical “diagonal” pattern and “butterfly cables” from each side. Under-arm panels as well as the sleeves are made in “diamond” pattern.
A separate butterfly cable is sewn to the base of the collar. Actually, it is not a decoration! It is a functional element. Functional not for the sweater recipient but for a knitter: it is easy to hide under this “necklace” (like in a pipe) lots of loose yarn ends that accumulate around the neckline. Instead of meticulously making them invisible in the seams around the neck with a needle and a hook in the end of the project - just pull them under this necklace, and they will always stay there!
Note about selvage stitches: I always slip the first stitch in the beginning of each row and purl the last stitch in the end of each row. In such a way I will have a chain of edge loops, - one vertical loop for each 2 rows - on each side of a knitted piece. They will be used to simplify rows count and later, when assembling this particular sweater, edge loops will play an important role: because I use inside-out seams, edge loops will form the nice rows on the right side of the sweater.
Trinity Stitch (worked over 4 rows):
1r and all the r.s. rows (right side rows) all purl
2r (ws) into the same stitch k1, p1, k 1 - all into the same stitch!, then p 3 stitches together. Continue the same way to the end of the row.
4r (ws) p 3 stitches together, then k 1, p 1 and k1 all into the same stitch; continue this way to the end of the row.
 Central panels are all “trinity” except for 2 first and 2 end stitches inside the selvages that are made in reverse stocking sts.
For the BACK CENTRAL PANEL cast on 54 sts (including 1 edge st each side) and work as follow:
First row (right side): 1 selvage st, 2 p, 48 “trinity”, 2p, 1 selvage st.
Second row: 1 selvage st, 2 k., 48 “trinity”, 2 k., 1 selvage st.
Continue to work this way until the piece measures 60 cm or 23.5’’ (140 rows or 70 selvage sts). Then in the right row bind off the middle 24 sts for neck (purling every 2 sts together before casting off). Decrease to shape the neckline on every other right row 10 sts and 5 sts (purling every 2 sts together before casting off). In the same way finish the opposite side of piece. So we have a piece with 71 selvage sts on one side and 72 selvage sts on the other side.
For the FRONT CENTRAL PANEL cast on 54 sts and work in the same way as back central panel until the piece measures 56 cm (130 rows or 65 selvage sts). Then bind off the middle 14 sts for neck (purling every 2 sts together where possible). Decrease to shape the neckline on every other row 7, 5, 3, 2 and 1 sts purling every 2 sts together where possible). In the same way finish the opposite side of piece. In such a way we obtain a piece with 71 selvage sts on one side and 72 selvage sts on the opposite side.
These 71 and 72 ss are much more important than the rest of decreasing instructions, so if we don’t obtain 71 and 72 – fudge the decreasing a little bit to obtain these precise numbers. Anyway the neckline will be covered with the braid, but 71 and 72 will form very noticeable inside-out seams.
Brushing central panels:
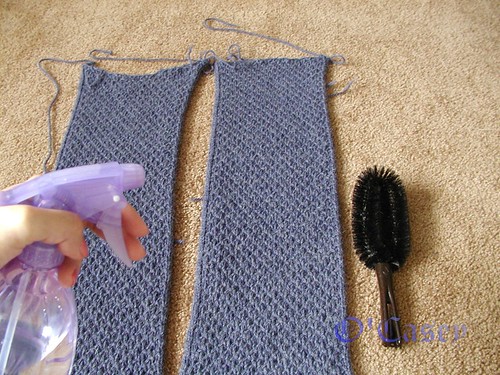
Spray their wrong sides with clean water and lightly brush them (see pic.). Let them dry completely.
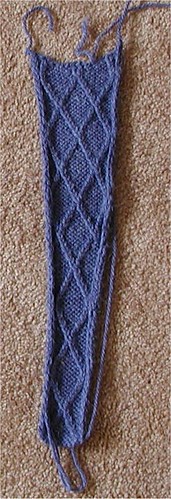
SIDE PANELS
Stitch explanation
2/2 LKC: slip 2 sts onto a cable needle and hold it at front of the work, knit next 2 st from left-hand needle, then knit 2 st from the cable needle
2/2 RKC: slip 2 sts onto a cable needle and hold it at back of the work, knit next 2 st from left-hand needle, then knit 2 st from the cable needle.
1/1 RPC: slip 1 sts onto a cable needle and hold it at back of the work, knit next 1 st from left-hand needle, then purl 1 st from the cable needle.
2/1 RPC: slip 1 sts onto a cable needle and hold it at back of the work, knit next 2 st from left-hand needle, then purl 1 st from the cable needle.
1/1 LPC: slip 1 sts onto a cable needle and hold it at front of the work, purl next 1 st from left-hand needle, then knit 1 st from the cable needle.
2/1 LPC: slip 2 sts onto a cable needle and hold it at front of the work, purl next 1 st from left-hand needle, then knit 2 st from the cable needle.
Butterfly cable
1st and all the right side rows: 2/2 RKC, 2/2 LKC
2nd and all the wrong side rows: all purl.
Right Oblique stitch
1r. 1/1 RPC, *1p, 2/1RPC* repeat 5 times
2r. and all the wrong side rows – knit the knit sts and purl the purl sts to the last st.
3r: 1k, *1p, 2/1RPC * 5 times, 1p
5r.: *1p, 2/1RPC * 5 times, 1p, 1k
7r: 2/1 RPC, *1p, 2/1RPC * 4 times, 1p, 1/1 RPC.
Left Oblique stitch (on 22 stitches):
1r. *2/1 LPC, 1p* 5 times, 1/1 LPC
2r. and all the wrong side rows – knit the knit sts and purl the purl sts to the last st.
3r: 1p, *2/1 LPC, 1p * 5 times, 1k
5r.: 1k, 1p, *2/1 LPC, 1p * 5 times
7r: 1/1 LPC, 1p, *2/1 LPC, 1p * 4 times, 2/1 LPC.
Cast on 55 sts. First Row: 1 selvage st., 3p, 8 sts of butterfly cable, 2p, 8 sts of butterfly cable, 1p, 22 Right Oblique stitch, 1p, 8 sts of butterfly cable, 1 selvage st.
Continue to work in this way until the piece measures 143 selvage sts. Bind off. This is a right side panel.
The left side panel is worked as mirrored right side panel with Left Oblique stitch.
When finished, spread them and lightly iron wrong sides of both panels through a wet cotton cloth, without pressing. Let them rest until totally dry.

UNDER-ARM PANELS (2 identical details).
 Cast 12 sts.
First row: 1 selvage stitch (ss), 1p, 1k, 6p, 1 k. 1p, 1ss.
2nd and all the wrong side rows - knit the knit sts and purl the purl sts to the last st.
3 r.: 1ss, 1p, 1/1LPC, 4p, 1/1RPC, 1p, 1 ss
5 r.: 1 ss, 2p, 1/1 LPC, 2p, 1/1 RPC, 2p, 1 ss
7 r.: 1 ss, 3p, 1/1 LPC, 1/1 RPC, 3p, 1 ss
9 r.: 1ss, 4p, 1/1RKC, 4p, 1 ss
11 r.: 1 ss, 3p, 1/1RPC, 1/1LPC, 3p, 1 ss
13 r.: 1 ss, 2p, 1/1rpc, 2p, 1/1LPC, 2p, 1 ss
15 r.: 1 ss, 1p, 1/1RPC, 4p, 1/1LPC, 1p, 1 ss.
Repeat from the 1st row.
Continue to work with “diamond” pattern increasing 1 stitch each side on every 7 selvage sts 4 times to obtain 20 sts on the needle . Continue to work this way until the piece is 42 selvage st long, then bind off the middle 6 sts. Decrease on every other row 2, 2, 1, 1 sts and bind off. In the same way finish the opposite side of the piece. Make the second one.
SLEEVE

Cast on 56 sts.
1st row: 1ss, 6p, *1/1RKC, 6p* repeat 6 times, 1ss
2nd and all the wrong side rows - knit the knit sts and purl the purl sts to the last st.
3 r.: 1ss, 5p, *1/1RPC, 1/1LPC, 4p* 6 times, 1p, 1ss
5 r.: 1ss, 4p, *1/1RPC, 2p, 1/1LPC, 2p* 6 times, 2p, 1ss
7 r.: 1ss, 3p, *1/1RPC, 4p, 1/1LPC* 6 times, 3p, 1ss
9 r.: 1ss, 3p, 1k, *6p, 1/1RKC* 5 times, 6p, 1k, 3p, 1ss
11 r.: 1ss, 3p, *1/1LPC, 4p, 1/1RPC* 6 times, 3p, 1ss
13 r.: 1ss, 4p, *1/1LPC, 2p, 1/1rpc, 2p* 6 times, 2p, 1 ss
15 r.: 1ss, 5p, *1/1LPC, 1/1RPC, 4p* 6 times, 1p, 1ss.
Continue to work with “diamond” pattern increasing 1 stitch each side on every 5th rows 16 times to obtain 88 sts on the needle. While increasing, include your added stitches into “diamonds”. Continue to work this way until the piece iss 42 selvage st long. Decrease each side on every other row 3 sts 1 time, 2 sts 2 times, and then 1 st each side on every other row until you have 58 sts on your needles. Then decrease each side on every other row 3 sts 1 time, 5 sts 1 time and 7 sts 1 time. 28 sts should remain on the needles. Bind them off. Cast 42 sts on the sleeve bottom and work 2x2 rib stitch – 8 cm or 3”.
ASSEMBLY Start with attaching of central panels to the side panels. Use mattress seam that is greatly shown here.
When making ordinary mattress seam we sew on the right side and obtain the seam visible only on the wrong side. In our case, to make an inside-out mattress seam we work on the wrong side of the sweater and from time to time admire the chains of selvage sts that show off on the right side. Start in the bottom of the sweater and proceed towards the neck. If some little mistake occurred and the numbers of selvage sts do not perfectly match and you don’t want to re-knit the details – fudge the mistakes around the neck, not in the bottom where they are very visible. The final necklace braid will hide them very well. Sew loose, make these decorative seams as stretchy as possible and checking the seam often making sure that they are as stretchy as the knitted material.
Then attach the under-arm panels with the same type of seam, inside-out. Also make them very stretchy.


Collar Cast on 98 sts on the neck line and work 2x2 rib stitch 22 cm or 9” long, bind off very loosely. I made it as described, but this job was not very pleasant; so I’d recommend knitting the collar separately and then sewing it on the neckline – will save lots of time and nerves. Sew the 9” collar seam with inside-out mattress stitch, in this case the seam is not to be visible when the collar is folded to the right side.
Braided necklace around the collar.
 Cast on 10 stitches and work a butterfly braid surrounded with 2 selvage sts. The braid should be 65 selvage sts long. Cast off. Starting from the left shoulder, sew the upper edge of the braid to the 2 row of the collar ribbing, very loosely. Sew the short sides of the braid and attach the other side of the braid to the sweater, a little bit below neckline. I tried not to position the braid flat, it looks better when slightly embossed. Hide all the loose threads around the neck under this braid like in a pipe.
Ribbing on the bottom of the sweater. First half: cast 120 sts on the assembled back and 1 under-arm panel (37 sts on each side panel, 40 sts on trinity central panel and the remaining 6 – on the underarm panel).
Work on 2x2 rib and bind off when the ribbing equals 8 cm of 3”.
Second half: cast 120 sts on the assembled front+ 1 under-arm panel (37 sts on each side panel, 40 sts on trinity central panel and the remaining 6 – on the underarm panel). Work on 2x2 rib and bind off when the garter equals 8 cm of 3”. Sew both halves together. Of course the ribbing can be made as one piece – I just don’t like to work with so many stitches.
Attaching the sleeves.
Sew the long seams of the sleeves with ordinary mattress seams. Reinforce the top line of the under-arm panels with 15 crochet stitches (optional).
Mark the top of the armhole and the top of the sleeve (1/2) with colorful yarn or stitch markers. Start sewing a sleeve into an armhole from the very bottom. When finished attaching the sleeve to the under-arm panel, begin to sew the sleeve deeper and deeper under the braid (not to its immediate edge). The top part of the sleeve should be attached to the inner edge of the braid and slightly eased in. The seam curve should be smooth (see Picture), and the free edge of the butterfly braid should rest loosely on the sleeve. The top marks should match.


12 comments:
Beautiful pattern!
Very beautiful sweater! Thank you for the pattern.
--balzac
This is a wonderful sweater!!! Thank you so much for posting the pattern and all the explanations!! I've added to my RAvelery que. It is stunning and I love how you explain all the pieces.
Great sweater! I will show it in my blog, hope you don't mind that I borrowed the picture (if so, let me know and I'll delete it).
Thank you for sharing the pattern.
Tina
Thank you all!
Tina, of course I don't mind :-)
Another wonderful design of very talented and creative technician (according to school records) :-) and knitwear designer! Attractive model, too!
cool blog!
спасибо большое было очень интересно читать
Спасибочки:) Классная тема, пишите чаше – у вас отлично получается :)
Хороший сайт! Все полезно сделано.
All excellent written
Wow, what an incredibly beautiful jersey.... I wonder if I dare try to make it :)) it looks difficult.....
MMMM, so beautiful...
Post a Comment