
A sweater for Valery. He is a Chef cook, flower whisperer, and husband of my dear cousin Lidochka. Everyone who knows him loves him, everything he cooks is delicious and beautiful, everything he fixes works and runs, everything he plants grows fast and thrives :-)


 More than 10 years ago I was impressed with an elegant Italian multicolored sweater with flower patterns, which looked however very masculine. Back then I decided to play one day with this idea, but did it only now.
Materials:
10 balls of Stroll Sport Yarn Sport from KnitPicks (75% superwash merino wool, 25% nylon) color – Baltic Heather, each ball 50 g /1.75 ounces – 137 yards.
5 balls of Felici Sport Self Striping yarn from KnitPicks (superwash merino wool, 25% nylon), color – Boutique, each ball 50 g /1.75 ounces – 164 yards.
Needles # 4 / 3.5 mm (or size to obtain gauge).
Smaller needles # 3 /3 mm (for ribbing).
Sewing needle.
Gauge - 22 stitches in 10 cm/4” worked on simple knit (fair isle).
Size – M-L

The sleeves consist of 4 details each: a central panel worked in fair isle 1; 2 sleeve braids; and an under-arm sleeve panel worked in fair isle 2. Fair isle and cords have different vertical gauge that is why they are worked separately.
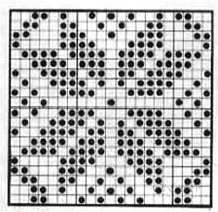
Fair Isle 1: Fair Isle 2:

Cable panel:

STITCH PATTERN cable panel:
Stitch Key
Stockinet Stitch: Knit 1 (k) on right side rows, purl 1 (p) on wrong side rows.
Reverse Stockinet Stitch: Purl 1 on right side rows, knit 1 on wrong side rows.
c6b: Slip next 3 stitches onto cable needle, hold at back of work. Knit 3, knit the stitches on the cable needle.
c6f: Slip next 3 stitches onto cable needle, hold at front of work. Knit 3, knit the stitches on the cable needle.
t2b: Slip next stitch onto cable needle, hold at back of work. Knit the next stitch, purl the stitch on the cable needle.
t2f: Slip next stitch onto cable needle, hold at front of work. Purl 1, knit the stitch on the cable needle.
c2b: Slip next stitch onto cable needle, hold at back of work. Knit the next stitch, knit the stitch from the cable needle.
c2f: Slip next stitch onto cable needle, hold at front of work. Knit 1, knit the stitch on the cable needle.
Row 1 (Right Side): k9, p1, k1, [p2, k2] 2 times, p2, k1, p1, k9.
Row 2 (Wrong Side): p9, k1, p1, [k2, p2] 2 times, k2, p1, k1, p9.
Row 3: k3, c6b, p1, k1, [p2, c2b] 2 times, p2, k1, p1, k3, c6b.
Row 4: p9, k1, p1, [k2, p2] 2 times, k2, p1, k1, p9.
Row 5: c6f, k3, p1, [t2f, t2b] 3 times, p1, c6f, k3.
Row 6: p9, [k2, p2] 3 times, k2, p9.
Row 7: k3, c6b, [p2, c2f] 3 times, p2, k3, c6b.
Row 8: p9, [k2, p2] 3 times, k2, p9.
Row 9: c6f, k3, p1, [t2b, t2f] 3 times, p1, c6f, k3.
Row 10: p9, k1, p1, [k2, p2] 2 times, k2, p1, k1, p9.
Repeat rows 3-10.
Note about selvage stitches (ss): Always slip the first stitch in the beginning of each row and purl the last stitch in the end of each row. In such a way you will have a chain of selvage stitches, - one vertical loop for each 2 rows - on each side of a knitted piece. I usually don’t count rows, I count selvage stitches. Another advantage – they look very nice when assembled by mattress stitch.
FRONT CENTRAL PANEL

BACK CENTRAL PANEL
Cast on 63 sts. And work straight 65 ss (130 rows), fair isle 1. Then in the right side row work 18 sts, bind off 27 sts, and work 18 sts to the end of the row. Turn and work to the end of the wrong side row. Then bind off in the beginning of the right side row 8 sts, and bind off the remaining 10 sts making sure that total length of the Front Central Panel = 67 ss (134 rows). In the same way finish the opposite side of piece.
LEFT SIDE PANEL
Cast on 34 sts. Initial row: 1 st – selvage stitch (ss), 9 sts – braid, 1p, 1k, 2p, 2k, 2p, 2k, 2p, 1k, 1p, 9 sts – braid, 1 ss.

Continue to work straight – 66 more ss, bind off.
The Right Side panel is worked as mirrored left side panel: work a piece 66 ss long, then in the right side row work 23 sts, the 24th will be our turning point. Take yarn to the wrong side of the fabric and slip the turning point stitch from left to right needle; take yarn to the front side of the fabric and turn work. The yarn is wrapped around the turning point. Always slip the turning point stitch in the right side row from left to right needle. It was the first short row. Make 4 more wrong side short rows. Mark the last selvage stitch on the inner side of the panel with a safety pin.
Continue to work straight – 66 more ss, bind off.
UNDER-ARM PANEL
Cast on 24 sts and work with fair isle 2 38 ss (76 rows). In the right side row work 7 sts, bind off the middle 10 sts and work 7 sts. In the beginning of each right side row bind off 3, 2, 1, and 1 sts. Bind off. In the same way finish the opposite side of piece.
SLEEVE CENTRAL PANEL

SLEEVE CABLE (4 pieces)
Cast on 11 sts and work 60 ss (120 rows). In the beginning of each right side row and in the end of each wrong side row decrease 1 stitch (10 rows = 10 sts). Bind off 1 remaining sts. Make one more piece.
Cast on 11 sts and work 60 ss (120 rows). In the end of each right side row and in the beginning of each wrong side row decrease 1 stitch (10 rows = 10 sts). Bind off 1 remaining sts. Make one more piece.
SLEEVE UNDER-ARM PANEL
Cast of 3 sts. Start with colored yarn only. In the third row increase 1 stitch both sides of the piece, and then increase 1 sts both sides of the piece in every 4th row until the piece is 41 sts wide (add blue yarn starting approximately with 9th row and work fair isle 2). Work even until the piece is 42 ss (84 rows) long.
In the right side row work 14 sts, bind off the middle 13 sts and work 14 sts to the end of the row. In the beginning of each right side row bind off 4, 3, 3, 2, 2, 1, 1, 1 sts. Bind off. In the same way finish the opposite side of piece.
ASSEMBLY:
When fair isle panels are finished, spread them and lightly iron them through a wet cotton cloth, without pressing. Let them rest until totally dry.
Using mattress stitching, make short shoulder seams, attaching Front Central Panel to the Back Central Panel.
Attach side panels to the center panels starting from the bottom. Sew loosely, making these seams as stretchy as possible and checking the seam often making sure that they are as stretchy as the knitted material. Then attach the Under-arm Panels with the same type of seam. Mark the 48th selvage stitch from the bottom on the side panels (4 marks), this is where the top points of the under-arm side panels will be attached. The gauge of fair isle and cable panels is different, so the number of selvage stitches of the Center Panels and Side Panels, which are being sewn together, will not be equal. But it is important to know where exactly the under-arm side panels end, and this is exactly the 48th ss on the cable panels. First, attach the left panel to the Front Center Panel, then attach the right panel to the Back Center Panel. Also make the seams very stretchy.


RIBBING (the body and the sleeves): use smaller size needles.
Cast 108 sts on the assembled back and under-arm panel Work on 1x1 rib 22 rows and bind off leaving a long thread for assembling. Cast on 108 sts on the assembled front + under-arm panel. Work on 1x1 rib 22 rows and bind off leaving a long thread for assembling. Cast on 44 sts on the sleeve bottom and work 1x1 rib stitch, work 22 rows and bind off leaving a long thread for assembling.
Finish the side and sleeve seems starting from the bottom.

COLLAR
Cast on 108 sts on the neck line and work 1x1 rib stitch 4 rows. Using smaller size needles continue work 14 rows, and the last 4 rows work with larger needles. Fold the collar to the right side, pin and sew the stitches on (Kitchener seam).
Mark the top of the armhole and the top of the sleeve (1/2) with colorful yarn or stitch markers. Start sewing a sleeve into an armhole from the very bottom. When finished attaching the sleeve to the under-arm panel, begin to sew the sleeve deeper and deeper under the braid (not to its immediate edge). The top part of the sleeve should be attached to the inner edge of the braid and slightly eased in. The seam curve should be smooth (see Picture), and the free edge of the cable should rest loosely on the sleeve. The top marks should match.
Wrong side: On me:


With Lidochka:


3 comments:
Oh, Casey, this is beautiful! Every time I see your new design I'm very impressed of your designing process - it is more a philosophy not just kniting process. I like how you use those panels which make realy unique impression of design. Chapeau - for your pation with this fair isle stitch!!!
And...you are really blessed to be surrounded by so many handsome man willing to model your designs. :-) Lucky you!
Happy summer!
Snjezana
WOW! I have never tried to do Fair Isle knitting yet, as I am still only a couple of months into knitting, but this one is calling my name! You do such BEAUTIFUL work, and your photos show everything step by step in assembly so nicely! Keep bringing the patterns for us guys! Thank you for being aware of the need for more REALLY NICE knitting patterns for men, as the scales are so largely tipped unfairly toward the ladies. Though I do not begrudge the ladies a thing, there is just so little out there that is unique like this for the more sophisticated, male knitters! THANK YOU!
A FABULOUS BLACK BEAUTY! So is the the cat! ;-) Seriously a winner for me! Every piece of work I see is just wonderful! I only wish I had the money to buy the yarn to make them ALL! You are very BLESSED OF GOD with your talent, and resources, and I thank you once again for being SO GENEROUS and sharing them all with people like me who would not be able to get them otherwise. GOD BLESS YOU and YOUR HUSBAND with all HE has to give!
Post a Comment