


The sweater is made for Volodia, electronic engineer from Toronto - Canada. We met with him and his wife Irina at our first job at the research institute of TV technologies. We worked at the same lab, and shortly we became close friends. Much water has flown under the bridge since that time, I’m not an engineer anymore, but he is, and a very good one :-).
I wanted this sweater to look like their soft-colored calico cat Sonia (this is their second calico. The first one, Basia, whom I introduced to them about… OMG… 20 years ago, was adorable too but quite different. We will always remember her). By coincidence, when I asked him what colors he preferred he listed all the Sonia’s colors. So, the color part was easy, and I used “Flowers” from Flowers sweater - just because I knew that color sequence by heart and didn’t want to make life more complicated than it was.

What about the design of the “Engineer’s Sweater”? Something modular… unusual… multidirectional… very smart… never seen before… probably worth patenting :-)… NO. Intermingling variegated colors of both yarns produce very interesting effects, which I started to like still at the stage of the swatches. That is why I decided to make the sweater extremely simple - no design at all. But 2-color knitting all over the body (except for the ribbings) and fingering weight yarn made it the most labor consuming thing I have ever made. And I enjoyed every minute of this slow work, admiring this beautiful fabric growing in my hands, this luxurious blend of colors… To add even more chic I finished all the ribbings with Italian cast-off.
 Materials: Knitpicks' Imagination hand-painted sock yarn (50% Merino Wool, 25% Superfine Alpaca, 25% Nylon; 219 yards/50 gram): 5 hanks of “Sasquatch” (darker color) and 4 hanks of “Castle Walls” (lighter color).
Needles no.4, circular needle no.4, several small safety pins, 1 large safety pin (stitch holder), and a darning needle for Italian binding-off.
Gauge: 4” (10 cm) of 2-color knitting = 23.5 sts.
Note about selvage stitches (ss): Always slip the first stitch in the beginning of each row and purl the last stitch in the end of each row. In such a way you will have a chain of selvage stitches, - one vertical loop for each 2 rows - on each side of a knitted piece.
Back

Cast on 143 sts (7 flowers + 2selvage stitches) and follow the color scheme. Work without any changes 39 selvage stitches (ss.) up.
(Right side): For the armholes bind off in the beginning of every row 5 sts – 1 time, 4 sts – 1 time, 3 sts – 1 time, 2 st – 2 times, 1 sts 2 times (107 sts on the needle now). Mark the last selvage stitches at both sides with safety pins.
Work without any changes 15 ss. (30 rows) up.
(Right side): To shape the shoulder and the neckline, bind off 10 sts, work 13 sts, bind off 61 sts (neckline), work 23 ss.
In the next row (wrong side) bind off 10 sts in the beginning of the row, work 13 sts.
In the next row bind off 3 sts in the beginning of the row, work to the end of the row.
In the next row bind off all the sts.
In the same way finish the opposite side of the piece.
Front
Cast on 143 sts (7 flowers + 2selvage stitches) and follow the color scheme. Work without any changes 39 selvage stitches (ss.) up.(Right side): For the armholes, exactly like for the back piece, bind off in the beginning of every row 5 sts – 1 time, 4 sts – 1 time, 3 sts – 1 time, 2 st – 2 times, 1 sts 2 times (107 sts on the needle are left). Mark the last selvage stitches at both sides with safety pins.
*********************************************
At the same time, shape the V-neck: after binding off 4 stitches from both sides for the armholes, mark the center stitch with a safety pin. This will be our front center stitch FCS.
In the right side row work until the FCS, let it slip to a small safety pin, then knit 3 with dark yarn, knit 2 together and continue with both yarn to the end of the row. Turn.
In the next row (wrong side) work with 2 yarns until you see 5 sts before the FCT, and with dark yarn only purl 2 together and purl 3. Slip the left half of the front piece to the large safety pin (stitch holder), it will be finished later the same way as the right side.
Continue with the left half only. Along the V neck line work as follows:
1. Don’t make selvage stitches along the neckline by slipping the first stitch from the left to the right needle because it makes the knitted fabric a little tight at the edge; but continue to make ss on the other side, along the arm openings;
2. Make decreases in each row (wrong and right side) at the same place (3 sts away from the edge) until the piece equals 20 sts; then work straight.
3. 3 edge sts and the decrease (2 together) of the V-neckline are supposed to be made with dark yarn only all the time. When piece equals 20 sts, 3 edge sts and the next one will be made with dark yarn only to frame the neckline evenly.
***********************************************End of V-neckline description.
Work without any changes 15 ss. (30 rows) up from the marked ss. To shape the shoulder, work exactly like with the back piece: in the wrong row bind off 10 sts, and work to the end of the row. Then turn, work to the end of the row. Bind off all the stitches.
The right side of the front piece is finished. Replace the large safety pin with a needle, and make the right half exactly the same way.
Note: The lines of decreases along the V-neckline should look nice and symmetrical; this is the most visible part that attracts attention. We all use different techniques for purl and knit stitches (American, continental, semi-continental, etc.), so make sure you use the right techniques to make these lines pretty.
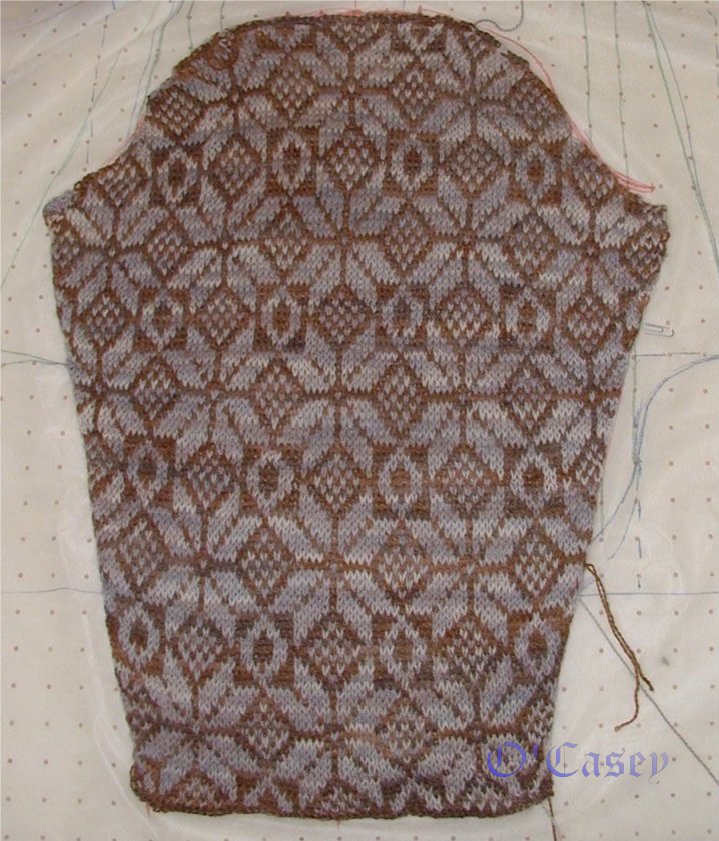
When finished, spread the back and front and lightly iron the right sides through a wet cotton cloth, without pressing. Let them rest until totally dry. 2 pictures to compare the knitted fabric before and after ironing:
 |
| Before ironing |
 |
| After ironing |
Sleeve
Lightly iron the sleeves as the back and the front.
V-neck ribbing

With a circular needle, starting at the left shoulder seam on the right side of the sweater cast 45 stitches from the seam till the front center stitch (FCS), slip FCS to the right needle but don’t remove the pin, cast 45 stitches from FCP to the right shoulder seam, and 45 sts on the back between the shoulder seams. When casting on, don’t pull the yarn through the edge stitch but through the next one, this looks better. Turn (I didn’t make the V-neck trim seamless).
(Wrong side) *Insert the right needle into the base of the stitch that is on the left needle and pull the yarn through it, casting on a stitch, then slip the existing stitch, which was made in the previous row, purl-wise from the left to the right hand needle, keeping yarn before the stitch*. Continue from * to * until all the stitches from the left needle are doubled in this way. Don’t double FCS, just slip it from the left to the right needle.
(Right side) Knit all the knit stitches (i.e. stitches that were casted on in the first row) and slip purl-wise all the stitches made in the previous row from the left to the right hand needle, keeping the yarn before the stitch. Special treatment for FCS:
1. In each right side row stop 2 stitches before FCS;
2. Change the order of the stitches on the left hand needle so that FCS is on the first place;
3. Slip FCS from the left to the right needle;
4. Knit 4 together;
5. Slip FCS through the obtained stitch.
Make 3 more rows in the same way, forming “hollow ribbing”. Slip FCS from the right to the left in the wrong side rows and treat it as described above in the right side rows.
Then in the right side row work as follows: *1 k, 1 k, 2 k together* to the end of the row.
Then work 8-9 rows of 2x2 ribbing, making selvage stitches by slipping the first stitch of each row from the left to the right needle and purling the last stitch of each row. Make sure that if you started with ss and 2 k, the last stitches of the row are 2 p and ss. If it is not so, make or decrease a couple of stitches. In this way the seam on the V-neck ribbing, which we will make later, will be invisible.
Then work a row of 1x1 ribbing. If your first 2 stitches are k, make the transition as follow: 1k, *switch the order of the next 2 stitches on the left hand needle, 1p, 1k, 1p, 1k* to the end of the row. If your first 2 stitches are p, make the transition as follow: 1p, *switch the order of the next 2 stitches on the left hand needle, 1k, 1p, 1k, 1p* to the end of the row.
Then work 4 rows of the “hollow ribbing” and make Italian cast off with a darning needle (see lots of videos on youtube).
Stitch together the short sides of the V-neck ribbing at the left shoulder.

Armhole ribbing
Exactly like for the V-neck, but cast on 88 sts along the armhole. And we don’t have a center stitch to take special care of!Bottom sleeve ribbing
At the bottom of the sleeve cast on 42 sts and work 20 rows 2 x 2 ribbing. Then make a transition to 1 x 1 ribbing, 4 rows of “hollow ribbing”, and bind off with the darning needle as described above.Bottom front ribbing
at the bottom of the front piece cast on 106 sts and work 20 rows 2 x 2 ribbing. Then make a transition to 1 x 1 ribbing, 4 rows of “hollow ribbing”, and bind off with the darning needle as described above.Bottom back ribbing - exactly like for the front.

Assembly
Finish the side seams on the sweater and on the sleeves. Insert sleeves in the armholes. The free edge of the ribbed trim should rest loosely on the sleeve.

 |
| On me |
 |
| With Sonia |


5 comments:
Love the Sweater!
Volodia and Sonia both look like two very kind souls.
I am inspired, by the beautiful finished sweater and by the yarn. I'm off to KnitPicks to plan something for my Dad. Thank you!
Gorgeous Sweater. Gorgeous Cat. Handsome friend and model. I like the extra rib around the sleeve cap. It adds that extra touch, which makes your designs so unique. Great work. Take Care & Happy Knitting. M
Love this!
I work with AllFreeKnitting and have been trying to contact you. Please email me if there is a good way to reach you. Thanks!
Adam Kaplan
akaplan@primecp.com
Post a Comment